Unless something very exciting happening this is the last blog. It's been a blast restoring the cart and a blast writing about it. I hope that you enjoyed reading about my little adventure.
The final numbers are in and I spent $2450 (not including my time). I think that the cart might be worth $2000 max but that's OK I didn't do it for the money.
Peace and Love
Dave
Wednesday, September 22, 2010
Wednesday, September 1, 2010
FAIL 2
I continue to drive the Little F***ker as she is affectionately known around the community in order to shake out any problems before I take her to the mountain. I was about a half mile from home when she just quit. A look around the engine showed that the fuel filter was empty so my first thought was that the new fuel pump that I had fitted yesterday had gone on the fritz. So I walked home got Susie and the Yukon and towed her home hoping that none of the neighbors would spot my shame.
As a shot in the dark I thought maybe a vapor lock so I took the fuel line off and squirted a shot of fuel in only to watch it shoot out of the pipe some 12 inches down the line. It turns out that when I had fitted the new pump I forgot to clip the fuel line in place and it had sagged onto the driven clutch which had then cut a hole in the pipe.
Perhaps I should blame this one on the mechanic not the cart.
Monday, August 30, 2010
FAIL !
I hope that this isn't the start of things to come but I may now be keeping a blog about failures. I have 1.9 hours on the engine and the first breakdown.
This morning I staggered downstairs and the lower I got the more I could smell gasoline. Eventually I got to the kitchen and it really was quite overpowering. The culprits were going to be the 63 Galaxie, the 2009 Soltice or the cart. Hoping that a kitten may have accidentally opened a can of gas and then tipped it over I ventured into the garage and found a puddle of gas under the cart. A quick look and it was clear that the gas was leaking from, of all places, the exhaust manifold. This as you can imagine was quite confusing but by a process of elimination (thank you Sir Arthur Conan Doyle) I worked out that it has to be a split diaphragm in the fuel pump. Casting caution and my wallet to the wind I drove to Martinsville and picked up a new pump. It is about the only part that I have not replaced so what the hell. Of course with the new pump fitted I had to check out the old one and here it is.
This morning I staggered downstairs and the lower I got the more I could smell gasoline. Eventually I got to the kitchen and it really was quite overpowering. The culprits were going to be the 63 Galaxie, the 2009 Soltice or the cart. Hoping that a kitten may have accidentally opened a can of gas and then tipped it over I ventured into the garage and found a puddle of gas under the cart. A quick look and it was clear that the gas was leaking from, of all places, the exhaust manifold. This as you can imagine was quite confusing but by a process of elimination (thank you Sir Arthur Conan Doyle) I worked out that it has to be a split diaphragm in the fuel pump. Casting caution and my wallet to the wind I drove to Martinsville and picked up a new pump. It is about the only part that I have not replaced so what the hell. Of course with the new pump fitted I had to check out the old one and here it is.
 The diaphragm (steady girls) is bottom right and if you squint your eyes you can just see the crack. Now I don't know if it's all psychosomatic but the little buggy seems to be flying with the new pump, maybe the leak was causing it to run too rich, we will see.
Actually the cart now has a name. It is called the Little F***ker. This derives from Susie saying get that little f***ker out into the yard. Now you might think that was a little uncalled for but she then proceeded to toss her cookies down the powder room. Personally I find the smell of gasoline (and Hoppes No.9 ) an aphrodisiac and I kind of figured with her bent over the bog it might be a good time to plight my troth but you know what, Monday mornings are painful enough without the unpleasantness of a spot of humpty dumpty getting in the way.
Wednesday, August 25, 2010
And there she is
There are still a couple of things to tidy up and I need to fabricate the uprights for the roof but essentially she is done!
 Even though I say so myself she isn't too shabby. It took nearly 3 evenings to get the trim back on and I now see why later carts don't have rubber trim.
 Check out the headlights. They may be tiny but that's 110 watts there so even when totally in the arms of Bacchus I should see my way home.
 Astroturf and the rear floormats from my old minivan (I miss that car (filling up))
 In the center is the engine hours counter which when the engine is running is also a rev counter. On the left is the light switch.
 A space for the cooler and a basket for the empties and new reflectors for safety.
 I still have to fix the very wayward steering but I found a new rack and pinion for just under $100 which is a lot better than $600 for the complete assembly. So fix the steering, put on the roof and then find a new project.
God how I love this shit.
Sunday, August 22, 2010
The vinyl wrap
As you can see, the body is wrapped and it all went rather well. There really isn't anything interesting to write about here so why don't you just look at the pictures.

 I even had enough left over to wrap the steering column.
 and the splash plate.
 So to finish up I have to replace the rubber trim, trim out the astroturf and install the headlights.

 I even had enough left over to wrap the steering column.
 and the splash plate.
 So to finish up I have to replace the rubber trim, trim out the astroturf and install the headlights.
Then the final job will be to fabricate some roof supports and install the roof and we are done !
Saturday, August 14, 2010
The seats
 It was now time to restore the seats and the first item on the agenda was to buy some wood for the seat and the seat backs. Although I didn't need an 8 x 4 sheet I knew I was going to be buying one and I knew it wouldn't fit into the SUV. I also knew that dragging the trailer up from the bottom of the yard was going to be tedious and wet. Then in a flash of inspiration I thought "Bonjour mon amis, I have a buggy, why not use it to haul the trailer". Here you can see the cart now earning its keep and saving my back, isn't that neat?
Now with staples in hand along with foam and batting and new wood and aerosol contact adhesive we went to work. For once I am not using the "Royal" we as I discovered when working on the Galaxie, Susie is actually pretty good at upholstery. It took all day and of course multiple trips to Lowes but you don't need to hear all that, you lucky people can just look at the pictures. It actually all went rather well as you can see.

and check out the matching steering wheel cover.

The floor of the cart was originally a fitted rubber mat but some time ago my old buddy JC Terry thought that if I were to wrap the cart in camouflage then maybe I should replace the worn out rubber with astroturf and here is the result.

I still need to glue it down and trim out the edges but I think that it is all going to look rather jolly when it is done. The next big leap forward will be to vinyl wrap the body and that is dependant on Everything Carts actually delivering the product that I ordered (and paid for) weeks ago. Still all in all some serious progress has been made this weekend.
A small rant
There really isn't too much European that I would hold up as shining examples of culture to the rest of the world. Of course it goes without saying that the National Health Service is the jewel in the crown of the Empire but I would also ask you to consider the British Standards Authority whose work has make the life of generations just a little easier.
When I first came to this country I must confess to a certain degree of bemusement as to how hard you made life for yourselves. Take plumbing for example. Now in Europe a fitting is a fitting, you want a P trap, then go and buy one. Yet in the good old US of I have never been able to complete a plumbing job without multiple visits to the Homo Despot. I have lost count of the times that I have carted a complete bath behind me in order to purchase the necessary 3/4 fine tread to 5/8 coarse reducer with a left hand thread to adapt a Kohler faucet to a Standard trap.
As another example let us consider towing hitches and balls. In Europe the ball is 50 mm (or 2 inches to you). Now I don't care what size our balls are but for the love of God make the bastards the same size. I have three trailers and I have three different size hitches, so pray tell me if you can, who the intercourse does this benefit? Certainly not me, in fact I run the risk of, in a moments inattention, of connecting my 2 inch trailer to my 1 7/8 hitch and sending $8000 worth of ATVs hurtling across I581 at 65mph.
You think I exaggerate? Let us consider ammunition. Now you people invented guns and bullets and all that stuff so you would think it would be all so simple and yet....... A 22 calibre mini mag will fit into my PD351 and it will fire and the case will jam in the revolver because it is too small so when you fire it the case splits and makes me cry. I can successfully use a 22 long rifle round but if I am stupid enough to use a long rifle round in my long rifle it falls out of the magazine because the rifle needs a 22 magnum round. It's a 22 calibre round for Christ's sake, the damn thing is supposed to be 0.22 of an inch in diameter, not 0.221 (minimag) or 0.222 (LR) or 0.223 (Magnum).
So it came to pass that I was finally ready to re-upholster the cart seats. Everything was set except that I had run out of staples. Two staple guns and a packet of staples that were clearly not designed to go in either. Bearing in mind everything I have said above and having learned my lesson (537 times) I carefully read on the side of the gun "Use Stanley 3/8 staples or Arrow 3/8 only". Off I troll to our local Lowes and buy my box of 3/8 Arrow staples and I get home and they don't fit. The damned worthless stinking staples don't damn well fit. Now do you get my point? Arrow make wide crown staples and do you know why? So that you and I give up and buy a gun with staples included. Well it didn't work once I realized that you can't hammer staples into particle board I made another trip to Lowes and with my blood pressure at 240 / 120 and my staple gun in hand I ripped open boxes until I found staples that physically fitted into the gun.
People of America I wave my genitals in your face until you form a National Standards Authority with the power to stop the nonsense. Oh and by the way steady as you go in aisle 13 there are staples everywhere.
Friday, August 6, 2010
Bad news and good news
As I mentioned earlier I needed to take out the play in the steering and fairly quickly deduced that it was in fact the steering box. Most of the forums stated that the box was not adjustable and when they were shot they were shot (thanks for nothing EZGO), still hope springs eternal in the human breast and all that bollocks so I took it apart and found that there were no user serviceable parts. I subsequently discovered that a new steering box retails at $600 so you will understand why I am typing this whilst sitting on the commode. A little later I found that some of the play was due to the fact I had failed to tighten up any of the wheel lugs, but it is still crap. As it happens I am kind of OK with this as there is a golf cart Mr Fixit down the road so I think I will give the whole problem to him.
On a more positive note I did install a tachometer and hours run meter and they work fine so tonight wasn't a complete jizzfest. While testing the tacho it occurred to me how excruciatingly annoying a 2 cycle engine sounds. If you have never heard one then play this 100 times.
On a more positive note I did install a tachometer and hours run meter and they work fine so tonight wasn't a complete jizzfest. While testing the tacho it occurred to me how excruciatingly annoying a 2 cycle engine sounds. If you have never heard one then play this 100 times.
Tuesday, August 3, 2010
Getting closer
I didn't blog yesterday because I worked until dark and not only did I not have enough light to take photographs I didn't have enough strength to press the button on the camera.
 Still as you can see I got the nose back on so it is starting to look more like a cart and less like the retarded granny that you keep in a closet when the neighbors call. I got a fair amount of filler on it and also a fair amount of the loathsome block sanding done. Although it is going to be vinyl wrapped (as opposed to painted) I still want the filler to be as flat as possible so I have another few nights of work ahead.
 I also got the new clutch on. This was the reason that I was working so late. For some sick reason the designers at EZGO placed the rear axle just close enough to ensure that the clutch will not slide off the crankshaft. When I first did this the engine, complete with clutch, was on he shop floor which was just as well because I had Susie stand on the engine whilst I bounced up and down on the wrench to twist the clutch off the shaft. If the engine had not been seized I don't see how we could have got it apart. I had to put the old clutch back on as I needed it to start the engine and the new one had not arrived. Anyway I discovered the 57 ways that you cannot remove the clutch before I realized that if I undid the bolt that holds the engine frame to the chassis I could then use the trolley jack to raise the engine the 3 inches necessary to clear the axle. The result is the new clutch below.
 And you can see how damned close it is to the axle.
 A little while ago I decided that constantly dicking around with a 25 year old carburetter was not going to work so I invested in a new one. I fitted that last night and here is the result.
To you this is just a vid, however to me this is huge, this is monumental, this is what it must feel like giving birth. It lives and it breathes. Now I need to take a moment and smile whilst I reflect on just how worthwhile this gestation has been.
I still have to adjust the carburetter and frankly I feel that the advice to run a first tank of 40:1 may have been incorrect as there is oil everywhere. I also discovered that the steering has got more than plenty of slack but it ran for a mile or so last night and that is good. The rest is just cosmetics. Now if you will excuse me I am going to watch the video again.
Sunday, August 1, 2010
A lifted cart.
I found a 5 inch lift kit on Ebay and it went rather well. As the frequent reader will know, it was
 a matter of necessity but in any case I do like the chunky look of the 22 inch tires on the 8 inch rims.
 I think that the next step will be to bolt the nose back on (now that it will fit) and then I can get on with the filling and sanding.
When I get bored with that, and I surely will, I have a carburetter to replace as well as the drive clutch. Then the cart will be running under its own power and I am left with the cosmetics.
Ah the end is in sight.
Monday, July 26, 2010
A tribute to Gene Field
Some years ago I restored a 63 Ford Galaxie. I had no prior experience but I did have a great mentor in Gene Field. Gene spent his entire adult life (and we are talking some 83 years here) in the business of restoring old cars, or as he would say with a smile, helping old junk down the road. Before that he was as an 18 year old fighting in Europe during WWII.
One of the many, many things that Gene taught me was that you can't hurry body work. You fill and you sand and you fill and you sand and so on. When you think it is perfect then you align it with the sunlight, pour water over it, look for the imperfections and mark them with a sharpie.
One of the many, many things that Gene taught me was that you can't hurry body work. You fill and you sand and you fill and you sand and so on. When you think it is perfect then you align it with the sunlight, pour water over it, look for the imperfections and mark them with a sharpie.
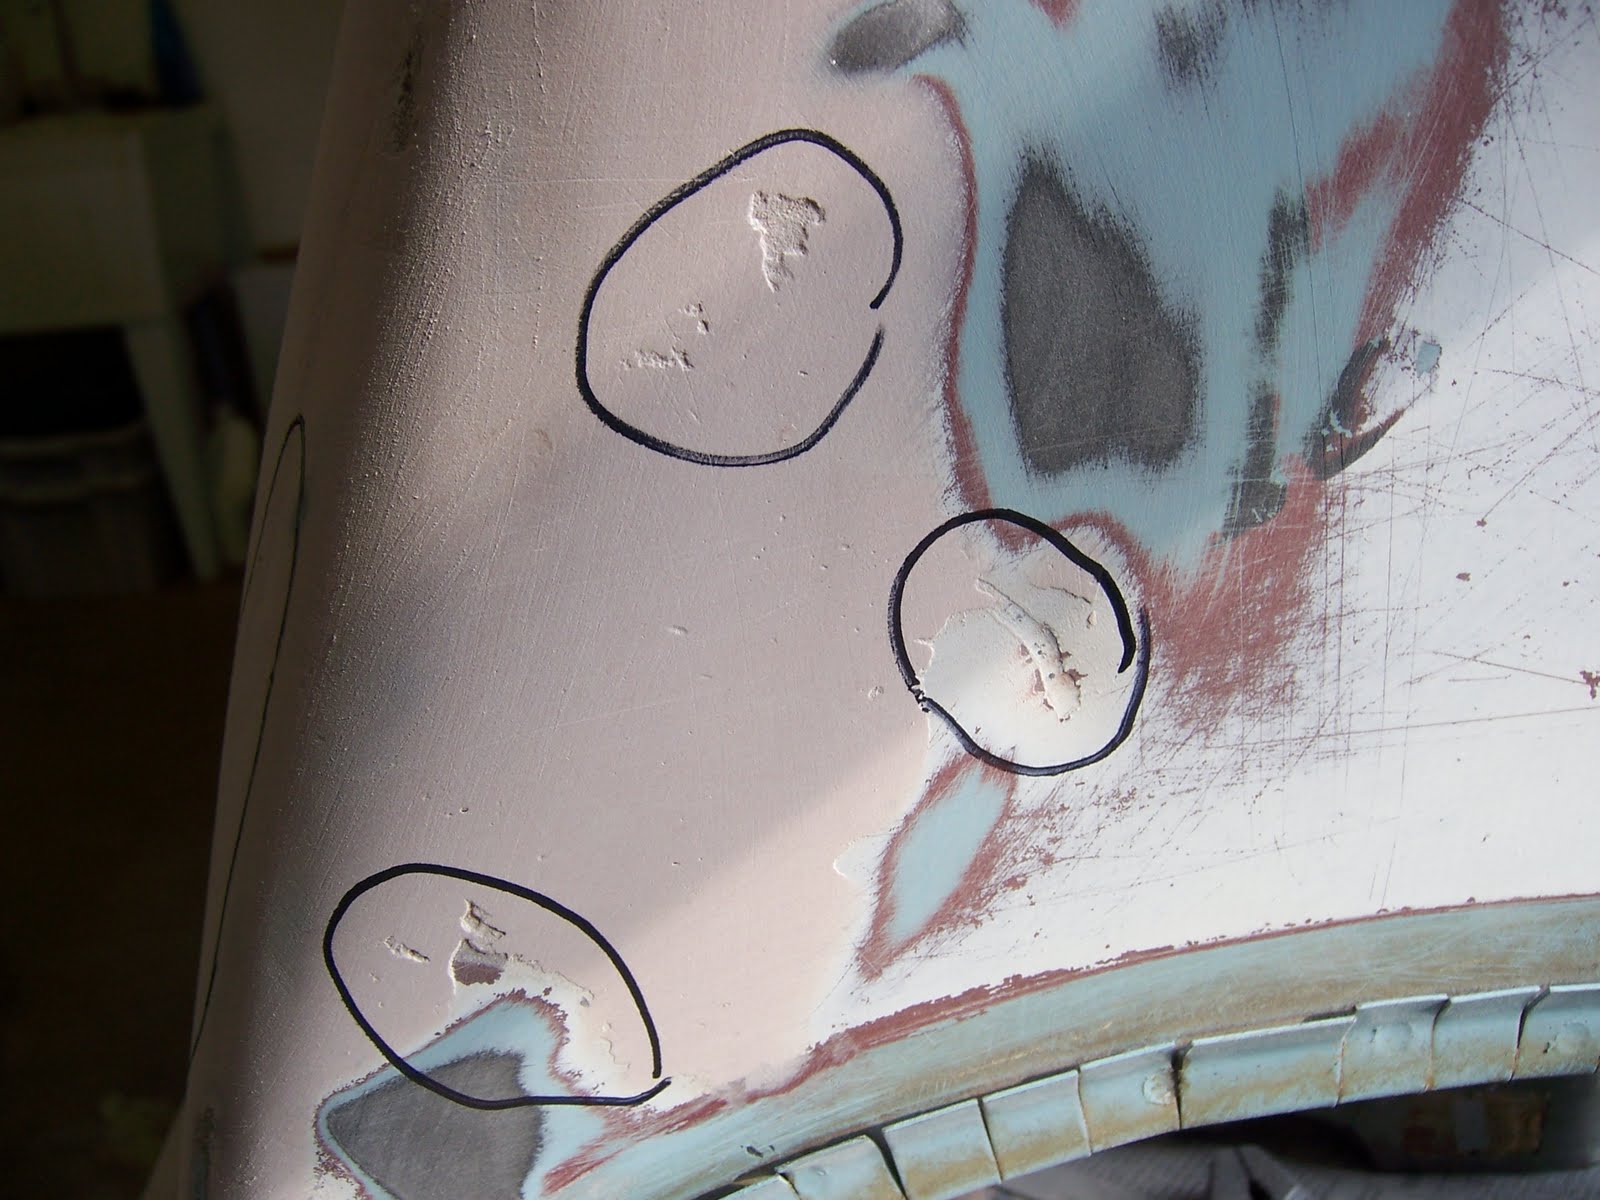 Then you fill and sand and fill and sand. The front of the cart has over the years taken a beating but I am, in the best Gene tradition, going to help this piece of junk down the road, Mr Field would have it no other way.
My old friend and mentor isn't doing too good these days and I don't think that he will be restoring any more pieces of junk but I know he will get a grin out of this old golf cart. Thanks for your help old man.
Thursday, July 22, 2010
The wheels are on, and off and on and .......
The plan was to leave the cart alone for a while and do some yard work but when I got home I found the wheels had arrived and, well you know how it is. I guess that the front wheels had not been removed for decades as the nuts were cold welded on, in fact they were so tight that the cart moved as I tried to spin them off. Still all's well that ends and I finally got to this stage.
 Now I am looking at the cart thinking that something is not quite right but I can't put my finger on it. Then I pushed the cart back and it wouldn't move. One of the front wheel was locked up. I
 looked closer and discovered the wheel was fouling on the track rod end WTF! How can this be? (If you want to play detective click the image above and see if you can spot the issue). Then I notice that it was in fact the valve hitting the steering and brilliantly deduced that I had put the wheel on inside out. Mistake number 1.
 So with the wheels on I stepped back to bask in my overt manliness and to my chagrin I saw that the tread patterns were slightly different. Then I noticed that there were directional arrows on the tires. Can you guess how many wheels were on backwards? Tout alors et merde as we say in German. Mistake number two.
 So now I am at this stage and I think we can all agree that it looks quite magnificent, yes? So I decide to offer the front end up and discover that the body has different clearances to the chassis and there is no way on God's earth that it is going to fit around these fat boy tires. Mistake number three.
As it happens this is not the end of the world. A 4 inch lift kit will make my problems go away and I was toying with the idea anyway so this is just a nudge in the right direction. Still all in all I should have stuck to the yard work.
Wednesday, July 21, 2010
Onwards
I have noticed that if you go to the newer flashier auto part stores you are inevitably served by kids who know squat. However if you go to the old school stores you meet folks who know about car parts. Case in point I went into my local NAPA and told them that I needed to improvise some rubber muffler mounts for the cart. They guy went off to the rack and came back with a selection of rubber parts that were largely meaningless to me but we worked out that cutting this thing in half and shaving the sides would work and now the muffler is on. Just in time really as I spent 15 minutes tuning the engine without the muffler and I seriously hurt myself. My ears were ringing for 24 hours and I still have an earache. Just goes to prove that you are never to old to be a dick.
P.S. just as a bolster for my ego the original did not have rubber mounts and the muffler was bolted meal to metal. However on half is bolted to the frame and the other to the engine, which vibrates. Hopefully my design will cut down on vibration through the frame.
P.S. just as a bolster for my ego the original did not have rubber mounts and the muffler was bolted meal to metal. However on half is bolted to the frame and the other to the engine, which vibrates. Hopefully my design will cut down on vibration through the frame.
Tuesday, July 20, 2010
Cleaning the muffler

 The regular reader (all one of you ) will recall the saga of my cleaning the engine by putting it in the dishwasher on a heavy wash cycle. Well like most of my bright ideas it didn't really pay off, although it did leave a nasty oily residue in the bottom of the dishwasher which lingered for weeks.
I now need to clean the muffler. It turns out that because the engine burns oil and gas the muffler gets choked with a gunky residue and this has been know to solidify, block the muffler and of course stop the engine. Apparently the solution is to barbecue the muffler. Yes indeed you put it on the barbie and get it up to 500 degrees. This supposedly burns out all the crap and you are good to go. Now my BBQ is up on the mountain but I think I have a better solution. As I understand it, an electric oven on the self clean thingy gets up to 800 degrees so I could just bung it in and clean the oven. Of course I need to smuggle this past the old girl and therein lies the fly in the ointment.
I have no idea how the oven works. BUGGER!
Monday, July 19, 2010
New wheels
 Today I realised that I was going to spend some serious cash. I scoured the four corners of the Internet and found these bad boys. They are exactly what I wanted. Big chunky tires with the added bonus of being premounted onto 8 inch rims. This will increase the overall diameter from 18 inches to 22 inches and should just about fill the wheel arches. I think that we can all agree here that size is important.
I also bought the two clutches today. I managed to find OEM parts at a good price and what is more they actually took the trouble to call me and let me know that a) they had my order and b) I should expect it all of Friday. It turns out that of all the places in the US they are 20 miles from my home.
Of course with all the money I saved I bought a new carburetter so I didn't save anything at all, but I'm still stoked about the cart.
On a practical note I now suspect that the final cost will be closer to $2000 that the planned $1500 (isn't that always the way?) On the face of it I could have just spent $2000 on a cart but at least I will be driving a cart with a new engine, a new set of clutches, a new set of wheels and tires and a new paint job. In addition what value can I put on the fun it all is to pull a piece of crap out of the woods and turn it into a fun machine.
If you think that I am just trying to justify my crazy logic, you are right.
Friday, July 16, 2010
It's Alive!
When I started this project I tried to work out the finals costs, of course I was way out. Case in point, last night I needed to buy the belt between the starter and the engine. Now this is just like a regular fan belt and yet for some reason it cost $20. (I know bitch, whine, moan).
Anyway I fitted the belt, fitted the throttle cable, fitted the choke cable, squirted a shot of gas into the air intake and........
Anyway I fitted the belt, fitted the throttle cable, fitted the choke cable, squirted a shot of gas into the air intake and........
Now you would think that at this stage I would be doing a happy dance in the sun and I guess that I was because all of the electrical components that were hitherto untested actually worked as you can see. Sadly there must still be some crud in the carburetter as the best I could get was a fast idle. Still nothing that can't be fixed or maybe the better option will be investing $89 in a new carb.
For the moment I am content to bask in the glory of a little Robin 249 cc engine that fires up.
Wednesday, July 14, 2010
The engine is back in
After much heaving and moaning I got the engine back in. It actually lies on its side and there are 4 bolts on the bottom of the crankcase and three on the top. In rather a nice design feature the top bolts on each end rest in slots so you can drop the engine into the cradle and then get the remaining bolts in.
 I got the starter / generator wired up and joy of joys the motor spins (in both directions). For reasons I don't understand the reverse warning now works. It hasn't up until now and I just assumed it was shot. It must be something to do with the starter finally being connected.
 Tonight I will buy some gas and a starter belt. Then connect the new throttle cable and the choke and see if she starts.
Friday, July 9, 2010
Another step closer
Sometime in the past the starter / generator bracket broke and the douchbag that was driving the cart "repaired" it by jamming a block of wood between the engine and the generator. (Lest you think that douchbag is too stern a description, this is the person who ran it without an air filter until the crankcase filled with dirt and it seized up whence it was dumped in the woods. Under the circumstances I think that we can agree his full name is Douchy McDouchbag from Douchville).
 Anyway I scoured the four corners of the Internet and eventually found a kit that supposedly converts a Harley Davidson generator from spring loaded to adjustable, whatever that means. With a spot of drilling and twatting I got it all together and even if I do say so myself I am rather proud of my overt manliness
 The strap is a touch too long but if the seat closes then I shall leave it alone. If not then I shall tickle it with the angle grinder.
Now it is Friday night and I can either write a long technical blog or do in a case of Heineken.
Wednesday, July 7, 2010
More stripdown
Lots more progress. I finally got all of the trim off and let me tell you that was no easy task. It needed to be done because a) some halfwit had sprayed the entire cart (including the rubber trim) white and b) the trim wraps around from back to front and had to be removed to get the front off. Incidentally under the trim you can see the original color, a rather fetching duck egg blue.
 So with the trim off I was finally able to remove the front end and although it only took you seconds to read about it, it took me hours to achieve. Lucky you. With the front off I was able to sweep out 10 years of leaves and squirrel's nests, but I did find ......
 ...... some old wooden tees and a marking pencil. Now call me a gay bar loiterer if you will but I find a certain fascination in the realization that many, many years ago this piece of junk was actually a golf cart that was used to haul golfers (too lazy to walk) around a course. Not for the first time do I fantasise about having a time machine to see the living history of whatever. Ooopps, seem to have drifted off here.
 I also made a start on the electrics. With the aid of copious quantities of WD40 I was able to free up the throttle and the lever from the throttle to the hill brake which now all works. Contrary to expectations the micro switch on the throttle was not welded in position and a small adjustment of the actuator got that running. I needed to remove the throttle cable and sadly sheared off the bolt that holds it to the rod so it looks like another huge expense with those avaricious vipers at EZ GO. Still I did manage to get a generic choke cable and ignition switch at my local auto parts store so that saved me some of my hard earned wedge.
 I also removed the oil reservoir as I have decided to go the pre mix route, it just kind of worried me that there were too many things to go wrong with the oil pump system and if they do go wrong then the first symptom is my newly rebuilt engine seizes up.
Tonight I shall spray the engine bay with Rustoleum black and carry on with rewiring the ignition.
Thursday, July 1, 2010
Done
There it is (nearly) all finished. Last night I installed the ignition sensor, the flywheel, the fan and the cover. I bought a whole load of miscellanea last night and when I got home I found that the store clerk had not put the tin of engine black in the bag (not quite the disaster it might have been as he didn't even ring it up) so my plan to paint the air deflector didn't happen.
 Also the bracket that allows you to adjust the tension on the starter belt is broken so I need to get that welded up. (Someone in the past had jammed a block of wood between the engine and the starter).
 Missing forever was the gas cap so I found a nice replacement and as this is rather a short post here is a picture for your edification. Enjoy
 With the engine out working on the engine bay will be a lot easier. It looks like in a fit of pique someone has ripped out some of the wiring so the next step will be to remove all of the ignition parts, clean out the bay and spray it all black. Then replace the wiring and the connectors and see if she will fire up. Once that is done I need to drop another (softly sobbing) $400 on new clutches. Then to beat and fill the body straight respray and I should have a new 1986 golf cart.
Wednesday, June 30, 2010
Onwards
This is how I started the evening, the first job being to remove the piston so that I could insert it into the cylinder
 On the plus side, the ring compressor worked like a dream. On the negative side it is always a pain to have to buy a tool only to use it once, such is life.
 Without any drama at all (and let me assure you that is a novelty) I got to this stage, the piston is in the cylinder and the cylinder is sitting on the block. Doesn't that look sharp?
 On the plus side, the ring compressor worked like a dream. On the negative side it is always a pain to have to buy a tool only to use it once, such is life.
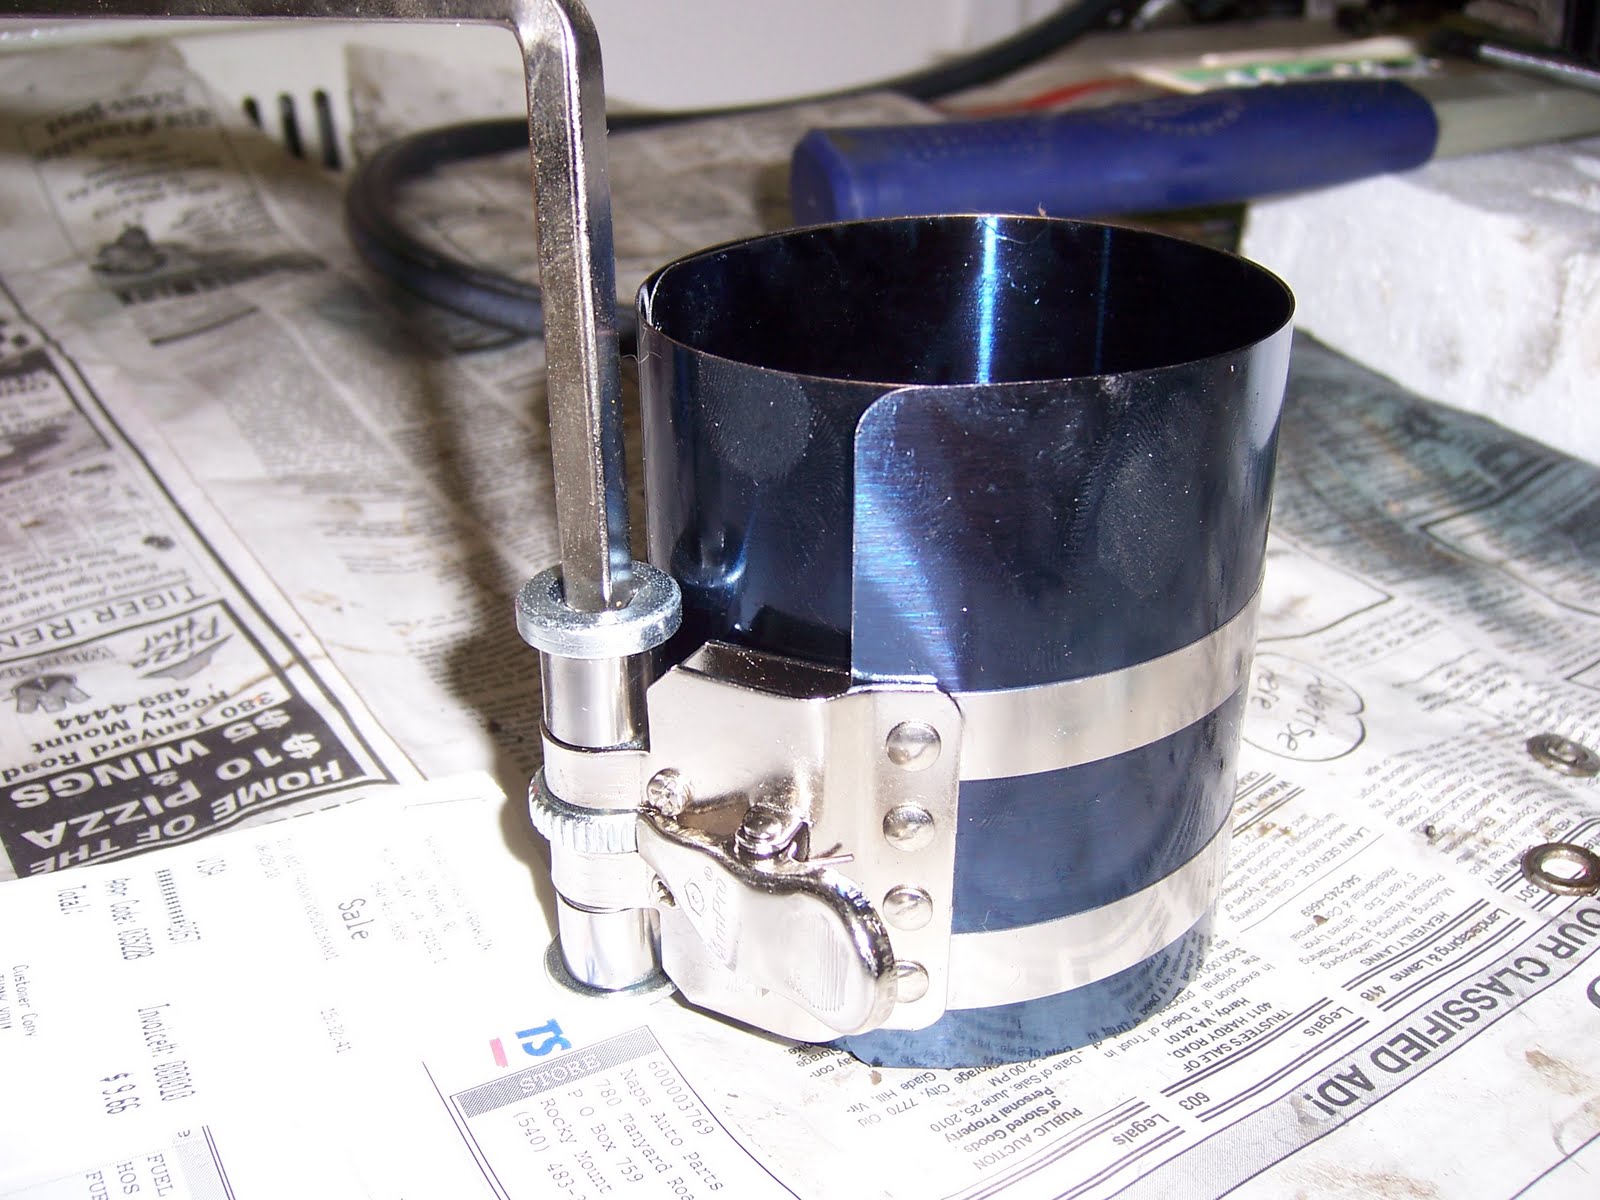 Without any drama at all (and let me assure you that is a novelty) I got to this stage, the piston is in the cylinder and the cylinder is sitting on the block. Doesn't that look sharp?
 Now many years ago I discovered that I am not as smart as I think I am when it comes to remembering where the bits came from. So these days I use a ton of ziplock bags and with a sharpie I bag and label every little group of parts. I found the baggie that said cylinder crankcase nuts which also contained the old little end roller bearing and two spacers. A quick look at the engine schematic proved that these should have been fitted with the piston so it was off with the cylinder and once again off with the piston. Still on the bright side I got to use my ring compressor more than once.
 And here we are the cylinder is bolted down and the head is on.
 Finally I got the carburetter on as well as the fuel pump. Because I had reassembled the fuel pump incorrectly it would not fit in the space and was fouling on the starter bracket. It took about an hour to work out what had gone wrong. Still it only took you 10 seconds to read about my misery.
 Tonight I shall install the ignition sensor, the flywheel, the fan and the fan shroud. That will complete the engine rebuild and then I will start to rewire the engine bay.
Monday, June 28, 2010
Getting it back together
The next hurdle was to get the journals onto the crankshaft. Once again it transpired that I knew a man who knew a man and JC came up trumps, so here is the completed item. Now and lest you wonder why are there two bearings on the right side? Well this is the side that houses the centrifugal clutch and thus is subject to the most stresses.
 Of course getting the bearings into the crankcase halves was a pain as they are also an interference fit, still I was able to get them close with the help of a rubber mallet and then use the bolts to clamp the halves together.
 I decided to mount the piston to the connection rod next and I was going to use the term gudgeon pin but I just knew that you colonials wouldn't understand so I looked it up and apparently you call it a wrist pin. Anyhoo the gudgeon pin is held in with two spring clips and it was patently obvious that if the clip pinged off the end of the needle nose pliers I would be in a world of misery. The first one snapped on beautifully so now being full of je ne sais quoi I decided that rather than turn the engine around I would do the second one left handed. Can you guess what happened? In a word "ping". Still once again I received confirmation that God is an Englishman as by some miracle I found the little bugger and this time using my dominant hand I got him on. (Many hours after I had cleaned up I realised that I should have inserted the piston into the cylinder before attaching it to the con rod so tonight it is coming off again, can you say ping?).
On a different subject I wanted to take the brushes off the starter motor / generator. There are 4 brushes, 2 for the generator and 2 for the starter. The first came out nicely but the screws on the other three were just rusted in. The good news is that there was plenty of meat on the one I got out so I settled for blowing some compressed air and lubricant in and replacing the brush.
Tonight I hope to get the carburetter, fuel pump, flywheel and cover back on. Watch this space.
Tuesday, June 22, 2010
The bits are here.
All my parts have arrived and this has spurred me on to greater efforts. As you know the engine was is in a filthy state and much scrubbing seemed to make little difference to the layers of grease, oil and dirt. The I hit inspiration, not a word to Mrs. P but as I type the two crankcase halves and the cylinder head are in the dishwasher on a heavy wash cycle.
I'll let you know how that works out.
I'll let you know how that works out.
Friday, June 18, 2010
Time to open the wallet

I haven't done too much with the engine lately. I did dismantle the fuel pump and clean it out of this real nasty brown gritty sludge, God knows what had happened here. Similarly I broke down the carburetter and again found it completely clogged with sludge. I did have a lucky moment when I used a can of compressed air to blow the fuel line out and inadvertently launched the cut off valve across the garage. By some miracle I found it and that saved the price of a new carb (and a lot of tears).
But the big news is I finally bit the bullet and ordered up the engine rebuild kit. Let the spending commence.
Wednesday, June 9, 2010
At freakin last
It really has been a miserable week or so, for various reasons. Still it ultimately ended in triumph and that coupled with the fact that if anyone could do it, it wouldn't be fun, is the main thing. Here is how it all went down.
In order to remove the centrifugal clutch you need a special tool to screw it out. You can either spend $49 or make it yourself for $10. I chose the cheap option which consists of a 3/8 rod and a 3/4 bolt. Sadly I bought a 9/16 bolt (why I ask myself) and this coupled with the fact that the instructions called for a 5 inch rod (titter) when I needed a 3 inch rod made it all a very miserable experience. Once I had all the correct parts I realized that I didn't have a 1 1/8 socket and so it was another trip to the hardware store. Finally we were set and then I discovered that I could not hold the block and twist the socket. So with me standing on the block and Susie bouncing off the socket handle, we finally spun the clutch off.
At the other end of the crankshaft is the harmonic balancer. Once again this needs a special tool but I made the job much harder by trying to use a regular puller. The whole thing was exceedingly tedious and it is more tedious to write about it, so let us just say that the balancer is also off. One of the main bearings had seized up and so getting the crankcase off was a bear until I hit it with a blowtorch and it literally fell off.
 And there we are one rusty crankshaft. One the right you can see the main journals still welded on.
That is as far as the tear down goes. Now it is crunch time. Up until now I have spent a few dollars on tools. In the next few days I have to decide whether or not to continue. I am sure that both the clutches will need replacing and that will cost circa $500, the engine rebuild kit is $400, the body wrap is $350 and I am sure that there will be a veritable cornucopia of other miscellaneous expenses. Would I be better off just buying a used cart for $2000?
I am going off to the mountains for a couple of days to decide.
Tuesday, June 1, 2010
Getting closer
So I will skip the boring stuff and cut to the chase. I got all of the peripherals off and then pulled the head. Now all this time I had assumed that the piston had seized as I could not turn the crank, however once I pulled the cylinder bolts and squirted some penetration oil in the bore the cylinder slid off. Here is a picture of the piston and you can see that there is plenty of blow through indicating that the piston rings are shot. If you look carefully you can also see that the piston is in fact cracked. There was never a possibility of me not rebuilding the engine but it is good to see that I made the right call.
 Below is the crankcase with the con rod sticking out of the top. The thing still won't turn so I am guessing that the main bearings have seized. Sadly this is where I came to another grinding halt. I need to remove the centrifugal clutch at one end and the flywheel at the other, both of which require special tools that I don't possess.

Once that is done I hope that I can split the crankcase and the tear down is complete. For now I am off to search for a friend with a puller.
 Below is the crankcase with the con rod sticking out of the top. The thing still won't turn so I am guessing that the main bearings have seized. Sadly this is where I came to another grinding halt. I need to remove the centrifugal clutch at one end and the flywheel at the other, both of which require special tools that I don't possess.
Once that is done I hope that I can split the crankcase and the tear down is complete. For now I am off to search for a friend with a puller.
Subscribe to:
Posts (Atom)